On 1st July 2011 apple has seed Mac OS X Lion Golden Master to the Developers as this release is believe as Release to Manufacture version of the OS. Now we can easily find the OS on many torrent website to try the brand new version of Mac OS X.
I will show how to install Mac OS X Lion Golden Master (11A511) on Generic Core2Duo Notebook using USB Flash disk method.
The notebook specifications are below:
- Intel T7500 Core2Duo @2.2Ghz
- 4 GB DDR2 Memory
- Intel GMA X3100 Display
- 320 GB HDD
- Broadcom BCM4311 802.11 Wireless Controller
Hardware and software needed:
- Mac OS X Lion GM Build 11A511
- Hide and Seek
- Chimera 1.4.1
- Some Kext and OSInstall.mpkg
- MultiBeast 3.7.3
- SwitchResX 4.2.3
- USB Flash Disk with 8GB Capacity
- PC/Notebook Running Snow Leopard
Preparation USB Flash
Run hide and seek, small utility to show hidden files on Mac OS X. Since there is a file BaseSystem.dmg which is hidden by default and can't be seen by Finder.
Download the Mac OS X Lion Golden Master from your favorite torrent site. Usually the installation file is in DMG (Compressed Image), but now since apple wan't to distribute Mac OS X Lion via Apple Store and Installation method is upgrade from existing Snow Leopard 10.6.8 now The file is on Application Format.
We want to install Mac OS X Lion from scratch (fresh install) instead of upgrading from Snow Leopard, so we need to open the contents of Installation Image.
Right Click on Install Mac OS Lion, and Click Sow Packages Contents
Double Click on InstallESD.dmg files to mount the images.
Find the files BaseSystem.dmg and double click the file to mount the images.
Plug-in the USB Flash drive ( I use Transcend 8GB)
Run Disk Utility from Applications -> Utilities - > Disk Utility
Click on USB Flash and Select Partition 1, Option GUID, and Apply
Click Restore tab next to the partition tab
Drag Mac OS X Base System to the Source Image and Drag Untitled1 to the destination and click restore. Type in your supervisor password when asked and begin restoring process. This restore will take approximately 5 minute depend on your USB Flash drive speed.
After finish restore the based system image the USB Flash drive will filled around 1.13GB of data. Next step is open the USB Flash drive and find Symbolic Link Packages in folder System -> Installation Packages and Drag into Trash.
Open Mac OS X Install ESD and drag folder Packages to Folder System -> Installation. This process will copy the whole folder Packages to USB Flash drive. It will take some times, approx 5 minutes and again depend on the speed of your USB Flash drive.
After finish it will be look like this on USB Flash folder System -> Installation and the drive will filled 4.4GB with data.
Open Applications -> Utilities -> Terminal
Copy match_kernel from Mac OS X Install ESD Volume to Mac OS X Base System on Restored USB Flash drive
Create directory /Extra and /Extra/Extensions on UFD
Put necessary Kext to USB Flash drive. I use FakeSMC and NullCPUPowerManagement
Repair permission on USB
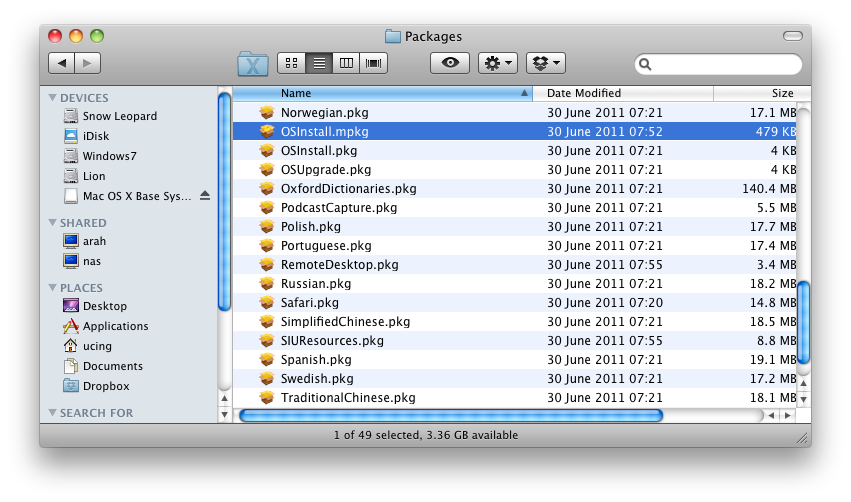
Replace OSInstall.mpkg to prevent Mac OS X Can't be Installed on this Computer message when bootup with original one. Find the files on USB Flash drive folder /System/Installation/Packages
The new files will be 672KB
The original files 479KB
Now to make the USB Flash bootable we need to install Chimera 1.4.1 to the UFD. Open up the files and install Chimera 1.4.1 to the USB Flash Drive.
Now the preparation of USB Flash drive has been done.
Next we boot up the notebook with USB as first boot priority
Install From USB
Install OS X Lion until finish, and reboot.
Post Installation
Boot from USB Flash drive, after chimera welcome screen, select Hard Disk drive with Lion installed.
Add user, password and location to the system.
At this point, we will encounter problem with the keyboard. Because integrated keyboard on the notebook will not detected since using PS/2 interface instead of USB. To fix this problem we install VoodooPS2 Controller and VoodooPS2 Trackpad from Multibeast. So we have to plug external usb keyboard and mouse during troubleshooting.
Troubleshooting
- Screen Resolution default 1024x768 while my native resolution is 1280x800 fixed using SwitchResX
- Keyboard and Touchpad not detected on Lion after installation fixed with install VoodooPS2
Progress so far:
- Display running at native resolution 1280x800x32 @60hz
- QE/CI Full Supported
- Audio Working with VoodooHDA.kext
- Keyboard and Touchpad working with VoodooPS2.kext
- Wifi work OOB
- Bluetooth work OOB
- Webcam detected on System Info but not working
Update 25 July 2011
- Webcam works after installing
camtwist, Thanks to Robi62 from InsanelyMac Forum.
Some Screen Shoot from Running OS X Lion on Fujitsu S6410